Even in January you can find something to do in your garden. On those mild days with sunshine you can get out and rake, spray your trees or even start pruning.
Days when that is not possible why not clean out the shed, and start to get those garden tools sharpened. You can clean blades with WD 40, getting any sap off the blades. Go ahead and start oiling all moving parts, cleaning any excess with a good cloth. Don't forget the wood handles on your tools, sand them down and then apply linseed oil. This will prolong their life for years. Make sure you get rid of your cloths properly, they can be a fire hazard.
During the dormant season take the time to remove any diseased or damaged branches from your trees, and do your corrective pruning. Pruning correctly is crucial to any tree health. Find good pruning instructions if you are doing it your self, improper pruning can result in killing the tree.
If you have fruit trees, it is also good during the dormant season to spray them. January is a great time for that. Spray a light horticultural oil, copper sulfur spray. Cherry trees need a bacterial canker using copper with spreader. Also check your peach leaf curl treatment with a spray of copper or sulfur plus spreader.
Raking up any winter debris is a good tip also. Some plants dropped leaves or flowering debris, and these can carry insect eggs or fungal disease. Have rose's, their leaves can carry fungal black spot. And for those Japanese camellias, they can easily spread petal blight. Raking can prevent any disease, so rake really good around tree base's. You can use your debris in a hot compost. Raking also minimizes disease and insect problems.
Chipping your leftover greenery can make a great mulch to spread around trees and shrubs, helping to protect their roots from temperature fluctuations. Also it helps to enrich your soil.
So start early when you can, and you will have more time in the spring to start planting those bulbs.
Monday, February 28, 2011
Saturday, February 26, 2011
Are you saving energy
Now with our economy you have to do as much as you can to put money in your pocketbook. And at the same time help save our planet for our children's future. With some little adjustments in our daily lifestyles, we can do alot. So I wanted to share a few with what we do in our home.
First off we try as best as we can to make our showers short. Most of the time people have a idea that if you don't take a long shower you aren't getting clean. When in fact all you are doing is feeding the drain more water. And don't forget your hot water has to be heated so there goes the utility bill. Make sure your hot water heater is set to 120 degree's. It saves energy and you still get plenty of hot water.
Also setting your home's thermostat to a more efficient setting is a good tip. You can get a electric thermostat that has a timer on it. During the day for our home, my wife keeps a mid temp, and at night we turn it down. This is the opposite of what they say to do, but my wife would rather have it warm when getting up and showered, then she turns it down and we uses extra sleeping blankets.
A long time ago my wife started unplugging certain things that we're not being used every day. Even things that we did use we just plug in when we need them. Leaving things plugged in still uses power. It doesn't matter if that appliance is turned off or not.
Also the light bulbs, change them to compact fluorescent if you can. There are alot of energy sufficient light bulbs now on the market.
Most homes have ceiling fans, but did you know that they had two switch directions on them. In winter months your fan should spin clockwise pulling down that warm air. During the summer months, your fan should be spinning counter clockwise helping out your air conditioner.
The biggest money saver is making sure your installation is up to the job. When your home has proper installation you are not only saving money but saving energy.
Next will be your doors and windows. Check those weather strips. You can be loosing air, or gaining air.
Do you have a tip to share?
Friday, February 25, 2011
This week
I am doing new construction work, putting the solar shingles on a house. So far it looks really good. They are so much easier to install than large solar panels. And look so much nicer. I know the property owner is very pleased. As I go along I am taking video so I will ad it on when the job is finished. Hopefully the weather will clear up. With that said I want to share today some contest and giveaways.
clorox/facebook contest
Trop 50/facebook contest
win a backyard make over
clorox/facebook contest
Trop 50/facebook contest
win a backyard make over
Wednesday, February 23, 2011
So what next
I got my oil bill today $590. What's next, gas is going up to, food going up. It really makes you wonder if it's ever going to get better. I can remember in 2000 when I bought this house and filled the tank for the first time it was only $100. I could get oil for .99 a gallon. Being in the construction business I like to provide tips for my readers. But what tips can you give for the cost of living going up everyday. So please let me know what tips you have.
Tuesday, February 22, 2011
Pavers

In the above diagram, please not the depths, which may vary depending on the type of project you are doing and your soil. Before you start have a good plan, and you can't go wrong. What type of path do you want to create, what type of driveway or patio are you seeking. Draw your idea on paper and scale it down. Use pencil so you can play around with your design until you have perfected it.
Make sure in your plans that your project has adequate drainage, this will keep your path safe and durable. Also if you path is going to be near any building structures make sure it has a slope away from the structure. The slope should be 1/8" per linear foot.
Most times for paths, creative designs are made. You have so many choices of pavers to choose from. Most being brick or concrete. There are many sizes, shapes and colors to choose, just find the style that best fit's your liking.
If your path is a common design you can calculate by measuring the square footage of the footprint by adding five percent. If the designs have alot of curves you should get ten percent over your square footage estimate. Always get extra because you will need some to cut. If you want to get fancy, you will more pavers that will have to be cut.
Outline the project area. Use string or garden hose to outline your project. Drive stakes to hold the outline in place and to make clean corners.
Your slope should be a little above your surface surrounding the ground at all points. When you plan your slope, start at what will be the highest point. This is usually the point at the bottom of the front door. Drive the first stake at your high point, and make a mark for the correct height where your pavers will meet the door. It is best to tie a string around the stake at that height. Next you will want to drive a stake at the outer boundary. This is the lowest point. Then attach a line level to the string, tie the loose end of the string to the outer stake at it's height at which the line level states. From that line you will move down the stake 1/8" per linear foot. If it is 8 feet from your front door to the outer edge move the stake 1", and draw a new line. You will then move your string down this line. Then string cross lines down the length of your project, this is to mark the correct depth across your entire project. With a project that has a variety of slopes, or if your design is irregular, repeat this step at several points. The slope is very critical, so the more you stake the better.
Make sure you measure your depth frequently. Always measure from the line, not the surface. Spaces will be exposed only to the foot traffic which you need 4 to 6" base material. Driveways and projects that are in wet soil will need 12" of base. If you need help figuring your base you local building supply store will help you. But make sure you add 1 to 1.5" for the sand layer, plum the thickness of the pavers. This will depend on the brand you use and the style. The typical base is 2 3/8 or 3 1/8. Your sum of depth of the base, sand and pavers will be how deep you'll need to excavate your projected area. Excavate 6 to 12" beyond the boundaries of your project to give enough space for your edge restraints. The depth of the excavation from your string will track your slope but not from the ground surface.
You will use a plate compactor for compacting the base. Your base material is crushed stone with sharp edges. Add no more than 2" at any time to your excavated area than compact. It is important your area is very well compacted. This process is repeated until your base is the correct depth. This will be your last chance to adjust the height of your project, and make sure you don't have any dips, or bumps. Increase or decrease your thickness of the base as it is needed. But make sure you make frequent measurements from your string base.
Outside boundaries will make your project more stable. You will install your edge restraints and secure them with landscaping spikes. These restraints will hold your projects shape for many years. The restraints are usually plastic, aluminum or even steel. The restraints will have to be cut in order to follow your pattern.
The sand is your glue for your project. It will need to be smooth to a depth of 1 to 1.5" but no more. For projects that are on the large side, you will want to lay 1" screed pipes, then pour the sand in between the pipes, in small sections of 50 to 100sq feet each. Then remove the pipes and fill in the gaps with more sand.
Next it's time to lay your pavers. This is really the easy part. Start laying pavers at a 90 degree corner. Usually at the abut of the structure. You can work from there, working your pavers in a straight line. Lay them in the sand do not slide them or kick them into place, because you don't want to disrupt the sand. Slide each one straight down the edge of the adjacent paver. You don't have to worry about gaps. Usually you want to have a gap of 1/16 between each pavers. Every so often make sure the pavers are level. You can do a string check. Keep your lines straight and work from the top of the pavers you have installed already. You probably have to cut some pavers for your edges. Don't try to curve your pavers to fit your edging. Lay your pavers than do your cutting. Make sure you do not step on your sand. Use the pavers you have laid so far. But don't step on ones near the edges this can disturb the sand. You can also seal your pavers with a sealer.

Monday, February 21, 2011
Family flu
Due to my entire family having a bad flu I am going to pass on blogging this evening. Hopefull I will be able to blog tomorrow.
Sunday, February 20, 2011
Quick Guide to Connecting a Chain Link Fence
With the snow melting it's time to start cleaning up and doing some outside home repairs. If you have dog's like I do, they love to jump at the fence. Which sometimes loosen's the connection's. Or you may even have a section where the wire link ends before the fence frame end. Therefore they need to be connected. You can weave fencing between the two ends of each wire roll, this will seam and tie the two together.

Just a quick tip. Do you have one?
Just a quick tip. Do you have one?
Saturday, February 19, 2011
It doesn't have to cost
A fortune to make make some simple home improvements around the house. There are a few things you can do yourself to make your home more attractive or appealing. And for the things you feel you can not do yourself, there are plenty of alternatives that you can do.
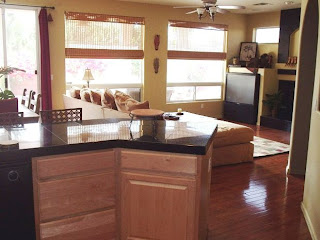
The first place you can begin is the kitchen. The place where most families spend the most time. New counters and/or cabinets are easy to improve and don't require a lot of money. Just by changing the doors, or just changing the handles or knobs will add a great look. If you have wood cabinets, or laminate cabinets you can apply a fresh coat of paint, using the same color or changing the color. To go one step further, why not give the ceiling and wall a new look. By painting you can even do some different textures, and create a design. Don't stop there, you can even get a different look by swapping out the old light fixtures, for some new ones. Light fixtures, come in many different styles, from modern to antique. If you have a wood floor in the kitchen, paint it with a nice design to match your kitchen motif. In addressing the window area, add some inexpensive curtains, that will make a big difference. You can also add a pre-pasted border around the wall, or chair rail area. Another inexpensive tip is to change the kitchen taps, there are so many neat one's to choose from.


General things to change or improve, is just changing the curtains, and bedspreads, throw pillows, and throw rugs. These are just some of the tips that can change the entire look of any room.
If you have a inexpensive tip to share, let me know.

The first place you can begin is the kitchen. The place where most families spend the most time. New counters and/or cabinets are easy to improve and don't require a lot of money. Just by changing the doors, or just changing the handles or knobs will add a great look. If you have wood cabinets, or laminate cabinets you can apply a fresh coat of paint, using the same color or changing the color. To go one step further, why not give the ceiling and wall a new look. By painting you can even do some different textures, and create a design. Don't stop there, you can even get a different look by swapping out the old light fixtures, for some new ones. Light fixtures, come in many different styles, from modern to antique. If you have a wood floor in the kitchen, paint it with a nice design to match your kitchen motif. In addressing the window area, add some inexpensive curtains, that will make a big difference. You can also add a pre-pasted border around the wall, or chair rail area. Another inexpensive tip is to change the kitchen taps, there are so many neat one's to choose from.

The next room, that you can spruce up is the bathroom. This room is probably the easiest one out of all the rooms, because of the size. Just by switching the toilet seat, to one alittle fancier, or even humorous is a good place to start. Also don't forget the toilet paper holder, they have one's that are stand alone's or wall mounted. The light switch cover is another thing that can be changed. They are no longer the standard white or gold plated, you can now get them in almost any decor style. Lighting in the bathroom is easy to change also, or add lighting above the medicine cabinet or bathroom mirror. Sometimes on clearance you can find bathroom vanities, if not see if you are able to paint them. Shower curtains, are the focal point of the bathroom if you have them, and there are ton's of designs to choose from. Even applying some tub applique's can make a difference.

General things to change or improve, is just changing the curtains, and bedspreads, throw pillows, and throw rugs. These are just some of the tips that can change the entire look of any room.
If you have a inexpensive tip to share, let me know.
Friday, February 18, 2011
Frame a Door
If you know some basic carpentry skills, than you can do a door frame. You will need some tools to get started, like a circular saw and a hammer. Re framing a door can also provide a good structural integrity to any wall.
Most of the time you will be installing a pre hung door, that is, a common standard size. So follow the measurements for a common door and you can install the door of your choice.

The first step you want to take is to prepare your wall where the door will be installed. If you are doing a re-framing, you will want to remove the sheet rock to get to the studs in that area for your door. For a first time installation, frame the door before you stand it up. Leave the floor plate and ceiling plate, you will cut them out later.
Next you will want to get your door size, then set your king studs. These support the frame. For standard door sizes your measurements will be 36 x 80. You need to find the center, and then mark it on the floor stud. This is called your determining point. You will then come 20 3/4 inches from your mark outwards on both sides of the floor stud and make another mark. They should measure 41 1/2 exactly. After this process you will cut a king stud, a outside stud, and fit it to the distance between your floor plate and the ceiling plate. For a standard eight foot wall you should have a measurement of 92 5/8 inches long. Always make sure you measure your opening. After which you nail the king studs, always making sure that the inside bottom aligns with your mark on the floor plate. Using a level, it is important to align your upper portion of that king stud to your ceiling plate, at that point you will nail it into place. After this is in place you will then work on your header.


Now you want to measure your opening, where your door will be hung. The measurement should be 38 1/2 inces wide, for a standard 36 inch pre hung door. This will also allow for a doorjamb space. The final step is to cut your section of your floor plate out from the trimmer studs, doing this before you install the final project, your pre hung door.
Most of the time you will be installing a pre hung door, that is, a common standard size. So follow the measurements for a common door and you can install the door of your choice.
The first step you want to take is to prepare your wall where the door will be installed. If you are doing a re-framing, you will want to remove the sheet rock to get to the studs in that area for your door. For a first time installation, frame the door before you stand it up. Leave the floor plate and ceiling plate, you will cut them out later.
Next you will want to get your door size, then set your king studs. These support the frame. For standard door sizes your measurements will be 36 x 80. You need to find the center, and then mark it on the floor stud. This is called your determining point. You will then come 20 3/4 inches from your mark outwards on both sides of the floor stud and make another mark. They should measure 41 1/2 exactly. After this process you will cut a king stud, a outside stud, and fit it to the distance between your floor plate and the ceiling plate. For a standard eight foot wall you should have a measurement of 92 5/8 inches long. Always make sure you measure your opening. After which you nail the king studs, always making sure that the inside bottom aligns with your mark on the floor plate. Using a level, it is important to align your upper portion of that king stud to your ceiling plate, at that point you will nail it into place. After this is in place you will then work on your header.
If you have reached this point your doing good. The next phase is to cut 2, two inch by twelve inch boards. They must be 41 1/2 inches long, and laying one on top of the other, on your floor like you are making a sandwich. After that you will nail them on each side. And wallah you have your header.
Now it's time to grab a helper, so they can help with lifting and holding your header between the king studs, and helping to nail it from the bottom. This is done on a diagonal, right into your king studs on both sides. Making sure you nail the top of the header into your ceiling plate. Next phase is cutting 2 studs that come to 80 1/2 inches long. This should measure the distance from underneath your header and your floor plate. These pieces are what your exterior trim that surrounds your door will be nailed to. Placing one on each inside king stud, making sure to wedge them in under your header. Always making sure the fit is snug up against the king boards. Next just nail them into place.
Now you want to measure your opening, where your door will be hung. The measurement should be 38 1/2 inces wide, for a standard 36 inch pre hung door. This will also allow for a doorjamb space. The final step is to cut your section of your floor plate out from the trimmer studs, doing this before you install the final project, your pre hung door.
Thursday, February 17, 2011
Cooking Dinner tonite
I decided since I have a easy day at work today I will cook dinner. And that is going to be bay scallops with spinach and bacon. Sometimes I serve it with pasta, but tonite I decided it will be rice.

The first step is to thaw the scallops, when thawed rinse them and pat them dry. Next in a bowl combine a little amount of flour about 1/2 cup with steak seasoning. Mix that well than place the mixture into a plastic resealable bag. Put your scallops in, and toss until coated well. Then leave the bag in the refrigerator for 15 minutes so they marinate. While you are waiting cook your bacon on high heat. You want to remove the bacon and let it cool. Next prepare your rice. After which get a pan with 3 tbsp of oil in it and get it hot. When the oil is ready add four cloves of garlic, 1/4 cup of red and white onions, and saute them for two minutes.
Then take your scallops and sear them until they are opaque. You have to turn them at least once. When the scallops are done, remove them and the onions from the pan. Next place you fresh spinach to the skillet and sear that, than sprinkle with some water. You then want to cover and cook over a medium heat, until the spinach starts to wilt. After you return the scallops to the skillet and cook for two minutes. Transfer to a serving platter and sprinkle your cooked crumbles bacon on top. Serve with your rice. You can also serve with everything on top of the rice also.
Do you have a scallop recipe to share?
Wednesday, February 16, 2011
Indoor Garden Veggie's
One of my favorite past times is gardening. And I use alot of my home grown veggies, in my cooking. Nothing taste better than fresh home grown veggies. Some vegetables can grow all year long in the home. So I wanted to share with my readers some tip's on how I do it.

The plants will grow great with enough warmth, light and love. I grow not only herbs, but my salad greens all year round. Not only is it economical, but I know they are always on hand when I want to use them. So veggies can only grow outside, but you can start them indoors under artificail lights, which gives them a great head start.
The plants will grow great with enough warmth, light and love. I grow not only herbs, but my salad greens all year round. Not only is it economical, but I know they are always on hand when I want to use them. So veggies can only grow outside, but you can start them indoors under artificail lights, which gives them a great head start.


Tuesday, February 15, 2011
Simple Green Industrial Cleaning Product Review
I was so excited today when I recived a package from the Simple Green Company with their Industrial Cleaning Products.

The company has been in business for well over 30 years. An all their products are Enviromentally friendly, and have been so from the start. It took some time but the company was able to make and perfect biodegradeable, non toxic, non flammable, and non abrasive formula's. The company now has products in homes, business's, and store's worldwide.

I couldn't wait to start using these products. I had in the past used Simple Green products, but not of the Industrial Strength. And being in the construction field, I couldn't wait to see the benefits of using them.

The first product I used right away was the Stainless Steal one step Cleaner and Polish. A 16oz ready to use spray bottle, that is made for cleaning chrome and stainless steal. Since my utility trailer has alot of stainless steal cabinets inside I decided to try this product out there. The guys get alot of grease and grim on their hands through out the day and leave traces all over the stainless steal cabinets. With just a few sprays the grease and grim started to run down the cabinets, and wipe off cleaned with a dry cloth. After my wife saw how clean my cabinets we're, she decided to use the non toxic product in our kitchen. She cleaned the kitchen sink, and the results we're fantastic. The sink had never looked so shiny, it was like looking into a brand new sink. She was very pleased, especially with the formula being pet friendly. It look's like I am going to have to share this product.

I also tryed the 16oz bottle of Original Concentrated Simple Green. This was the first formula that was created over thirty years ago. And very versitale, and economically custom diluted for many different uses. So I decided to give it a shot, and use it on the utility trailer floor. It was a vinyl floor that I had put in the trailer, and low and behold it came out fantasic also. I needed no other cleaning product, just the Original Concentrated Simple Green. Not only did it clean the vinyl floor, it left a clean fresh smell in a utility trailer, that once had the strong smell of oil, and gasoline. It was also very gentle on the hands, I needed no gloves. It also states that this product is safe for laundry too. I will leave that test to the wife.

Having corian counter tops in our home bathroom and kitchen. The wife and I we're excited to try the 16oz spray bottles of Simple Green Stone Cleaner, and the Simple Green Stone Polish. Up until now my wife just used window cleaner, and ofter had counters left with smear marks. So we gave these two products a try. These two products work as a team, first using a dry cloth we sprayed the corian tops with the cleaner, and the counter tops never looked so great. There we're no streakes, or greasy residue's left on them. They Shine that was left, was like having brand new counter tops. And once again being used in the home, these products we're pet safe.

The second part of cleaning the corian countertop's in the bathroom and kitchen, was to use the 16oz Simple Green Stone Polish. We we're pleased to know how easy these two products we're to use. The polish left a rich luster to the countertop's. And all we needed to obtain this lusterious look was the Simple Green Stone Polish and a clean cloth.
I was very pleased with the proformance of these products. All had a fresh clean scent to them. Not like other industrial cleaning products, that have strong orders. No heavy cleaning equiptment was needed, just clean cloths and the product. I would highly recommend these products.

You can purchase these products directly from their website, or from your local retailer. Their website also has alot of informative information about the company, products, and other informative information. Take some time and read real stories of other users.
With so many great products to choose from, you can't go wrong with this company.
Disclaimer: roof-detective has personally reviewed the product listed above. Roof-detective has not received any monetary compensation for her review. Roof-detective did receive a free product to try out so Roof-etective could evaluate and use it for her review. Roof-detective's thoughts & opinions in this review are unbiased & honest and your opinions may differ.
Monday, February 14, 2011
Detecting a Chimney Leak on the Roof

Any property owner knows that a roof leak can cause a great deal of damage. Water can seep into the foundation of the roof, a attic or even the ceiling below the roof.
Leaks surrounding the chimney are the most common of roof leaks. This can happen due to the flashing that protects the chimney has bent, crack or even separated.
You can inspect the chimney to see where the chimney leak is coming from. Start by checking the inside the home's ceiling. You will see discoloration or even sagging. By feeling the ceiling, you can feel for signs of moisture. This would indicate that "yes" you have a leak. But do some more searching to conclude it is the chimney.

At this point you want to get on the roof to inspect the flashing around the chimney. Signs you are looking for, is a worn flashing, missing caulk, cracks or even broken pieces. Caulk missing is the easiest repair, this can just be re-caulked. The bent, broken or missing pieces need to be done by a professional.
Sunday, February 13, 2011
Know your Windowsill

Windowsills on the exterior of your home prevent's leaks. You can adhere wooden sills to almost any type of material, such as brick, stone, stucco and siding. Depending on the type of wood you add, will give appeal to your windows, and also prevent any water damage. This may also help to increase the life of the window's trim.


A hardwood that can be used is Ash. A dense struture, this type is more resistant to rotting and water damage. It will work well for a exterior windowsill. It has a light brown color with a light grain making it a attractive wood to use.

Another soft wood would be Birch, a yellow, silver wood. The high density is more than pine, with a fine grain almost white in coloring. This wood is on the expensive side.

Then there is the Red or Silver Maple, which are both hardwood. This is the most resistant to water damage. Making it high quality for making a windowsill. With the high density and attractive grain, it has a swirling gold pattern. A very attractive wood.
Have another good wood for windowsills, let me know.
Saturday, February 12, 2011
Spring equals Compost
With Spring coming I have decided this year to make a compost bin, and make my own compost. I was told having compost is like having "black gold". Not only is it good for the environment, it is great for the soil.
I can use my compost to not only improve my garden soil, but to fertilize my entire lawn. I have already started saving my ingredients. Instead of throwing my kitchen scraps away I have put them to work for me. Doing this will save me alot of money that I normally spend on Fertilizer.
Remembering that composts is decomposed organic matter I want to make it a quality and watch what I make it from.

Egg shells
* Coffee grounds and leftover coffee from the pot
* Coffee filters
* Tea bags and grounds
* Fruit and vegetable peels and scraps
* Leftover cooked rice
* Shredded newspaper (black and white print only)
* Old or dried-out herbs and spices
* Matches (paper or wood)
* Houseplant trimmings
* Cooked or uncooked plain pasta
* Corn cobs and husks
* Nut shells
* Seafood shells (rinsed first)
* Fish bones
* Leftover wine and beer
* Wine bottle corks
* Pencil shavings
* Wood fireplace ashes
* Hair and fur

I can use my compost to not only improve my garden soil, but to fertilize my entire lawn. I have already started saving my ingredients. Instead of throwing my kitchen scraps away I have put them to work for me. Doing this will save me alot of money that I normally spend on Fertilizer.
Remembering that composts is decomposed organic matter I want to make it a quality and watch what I make it from.
Some things I have been saving for my compost:
* Coffee grounds and leftover coffee from the pot
* Coffee filters
* Tea bags and grounds
* Fruit and vegetable peels and scraps
* Leftover cooked rice
* Shredded newspaper (black and white print only)
* Old or dried-out herbs and spices
* Matches (paper or wood)
* Houseplant trimmings
* Cooked or uncooked plain pasta
* Corn cobs and husks
* Nut shells
* Seafood shells (rinsed first)
* Fish bones
* Leftover wine and beer
* Wine bottle corks
* Pencil shavings
* Wood fireplace ashes
* Hair and fur
Friday, February 11, 2011
Going Green With Rainwater
We all know that today, people are looking for ways to go green. Well I wanted to share a tip about rainwater. It is a free source of water, it's clean, and you can't get any greenier. When collected it can be used for watering a garden, houseplants, and even used for drinking water, and cooking. To collect it is not complicated. However you have to have space outside your home to have a rainwater collecting system.

To construct a water catching system you start with cutting a three foot section off a garden hose. The section should be wider at the metal end of the hose where the nozzle attaches. This end will attach to the middle of the collecting tarp, the other end will be sitting in a container that collects the water.

 You can then hammer some poles into the ground, this will support the four corners of the tarp, and hold it above the ground. Then tie the corners of the tarp to each pole, holding the tarp above the ground. Make sure the edges of the tarp are four feet from the ground. Also make sure there is enough slack, so the middle of the tarp is hanging closer to the ground. It doesn't have to be alot of slack, just enough to hang down a few inches in the middle in order to catch the rain water.

The last step is to place a container or barrel under the middle part of the tarp. Then placing the hose into the bucket.
To construct a water catching system you start with cutting a three foot section off a garden hose. The section should be wider at the metal end of the hose where the nozzle attaches. This end will attach to the middle of the collecting tarp, the other end will be sitting in a container that collects the water.
In the middle of the tarp, cut a hole, large enough to slide the rubber end of the hose through it. Carefully squeeze the metal end halfway through the hole. Just so it is tightly stuck in the hole. The metal end of the hose should not be no more than 1/4 inch above the hole on the tarp's top. The bottom part of the tarp should just rest of the hose sticking out. You will need to reinforce the hose with duct tape, around the bottom of the tarp where it pass through. Doing this will prevent the hose from coming out of it's position, and help any water from trickling out around the seam, where the metal end is touching the tarp.
The last step is to place a container or barrel under the middle part of the tarp. Then placing the hose into the bucket.
Thursday, February 10, 2011
Constructing a Pond
One of my projects this summer is to construct a Koi Pond. So I wanted to share some tips on constructing one:

Before constructing your pond, go to local pet stores and look at their
Koi ponds for some ideas.
Depending on the size of the pond that you have in mind, you will be able to find materials in retail or garden stores. Garden and pet stores can also supply you with plants.
Go to your local plant nursery for materials as well. They also carry water plants, rock, statues, and fountain kits for ponds.
Obtain a pond "base", the "shell" that will hold the water, fish, etc.
Get rocks and plants that can stay wet all the time, because they will be planted beside your pond, and you want them to be able to hold up to the moisture.

Pick your pump. If you want running water in your pond, there are hundreds, if not millions, of different kinds of pumps and fountains. Look in your local hardware or pet store to see their selection.
Plan on purchasing fish at your local pet store or garden center. DO NOT purchase fish until you have completely set-up/installed your pond and it has had a few days for the water temp/PH to settle. You can even add frogs (but they will probably come on their own), and if you're unsure of what kind of fish to use in your pond, ask for some advice at the pet store, and they can point you in the direction of the types of fish that would suit your pond.

Decide what type of pond you want. You can have a flat pond, by setting the base directly on the ground, and surrounding it with rocks. Or, you can have a raised pond, simply by piling up dirt (not too high) and flattening the top with a shovel, then set the bottom of your base into the dirt, until it's a snug fit. Build up rocks around the mound of dirt, plant some colorful flowers near your pond, with everything that is out there these days, the possibilities are endless.
Wednesday, February 09, 2011
Think about A Green Office
Some tips on how to make your office or workspace Green!

You don't need to be management to institute change; your role as someone who cares about improving the energy efficiency and healthiness of your workplace is just as vital as those able to make the "big decisions". In fact, change from the bottom-up is often a lot more effective as everyone has "buy-in". And just because you don't make the purchasing decisions, it doesn't mean you can't influence them. Do your research, point out the financial savings to management, and enlist the enthusiasm of your team members too. Find the information, show by doing, and create the momentum, all just because you care.
Conserve your computer's energy. For many people with desk jobs the computer is absolutely necessary to get things done. Yet, this "efficiency" comes at a cost - it is estimated that people waste over $1 billion in electricity every year just in computer use! <ref>SDIC, The Cost of an Unhealthy Workplace. To help conserve energy from your computer use, you can:
Invest in an energy-saving computer, monitor and printer - it's easy to find these computers thanks to the [[Conserve Energy|Energy Star label]] in the USA. The energy savings rating is available in many other countries as well.
Switch to energy-saving settings - the Climate Savers Computing Initiative recommends these power management settings.
Monitor/display sleep: Turn off after 15 minutes or less;
Turn off hard drives/hard disk sleep: 15 minutes or less; and
System standby/sleep: After 30 minutes or less.
Turn off hard drives/hard disk sleep: 15 minutes or less; and
System standby/sleep: After 30 minutes or less.
Setting the computer to sleep mode when you are away for short periods of time makes good sense. And don't use a screensaver - these use energy rather than save it, and you are much better off relying on the power management features to power down to lowest energy use, or sleep mode. A computer in sleep mode can save 60-70% of power.
Turn off your computer whenever you’re not using it, especially when leaving work. And note that it isn't true that turning your computer on and off will wear it out. Make Use Of, The Ultimate 5 Ways to Go Green on Your Computer. Switch to a laptop or a thin client. Laptops and thin clients use less energy than desktop computers. Climate Savers Computing, Power management instructions. Turn off all peripherals when not in use. Peripherals such as printers, video cards, speakers, and scanners continue to consume power even when not in use. Unplug them and save energy.
Unplug power adapters when not in use.
Unplug battery chargers and other chargers when the charging is complete, otherwise they are still consuming energy.
Using a power strip as a central turn-off point can reduce the number of switching off actions required.
Reduce printer use. The printer is one of the most used office items. Every day it cranks out tons of important faxes, emails and other documents. Here are some ways you make your printer use greener:
Try not to print in color - learn how to Cut Printing Costs on Inkjet Color Printer.
Use a printer that does double-sided copying. If your workplace doesn't have this, request that such a printer be added to the network and designate that one for the big printing jobs.
Print in draft mode. In addition, try to print more screen pages to a paper page. Printing two screen pages per printed page is still very readable and double-sided, that means four screen pages per one paper page - a huge paper savings!
Properly Dispose of Ink Cartridges and toner cartridges - learn how to Refill and Reuse a Printer Cartridge.
Try to use a multifunction device. This is a combination of printer/scanner/copier in one. Provided it is Energy Star rated, it can save both energy and space.
Reduce your paper waste. Do you really have to print out every email and handout? Reduce paper waste by deciding to Go Paperless wherever possible. You can try to:
Keep copies of important emails, files, and more on your computer.
Use old paper with extra space to print small documents.
Don’t get any extra catalogs or magazines mailed to your office. Use a sharing system to pass around interesting materials between everyone's in-trays. This saves paper and money.
Get your check directly deposited. Payment direct to your bank account saves paper.
Send company updates through email instead of on paper.
Review any documents online instead of printing them out. It's commonplace to hear people say that they cannot read on the computer screen but it's a learned skill like most work skills, and with practice, it is possible to read most of your work on-screen and print only when absolutely necessary. If you have problems with eye strain, see your doctor.
Prioritize your paper use. If you do use paper on a daily basis then you can make eco-friendly paper choices. Here are some things you can do. Buy recycled and chlorine-free paper.
Try paper made from organic products like bamboo, cotton or hemp.
Print on both sides of the paper.
Shred old paper to use as packing material.
Save and Reuse a Corrugated Box for Mail.
Use old sheets of paper for scrap paper or note-taking. Use mistake prints as scribble paper, or send a stack along to your children's daycare or school for artwork use.
Reduce energy usage. Along with reducing the energy usage of your computer and peripherals, there are a number of broader ways to reduce energy usage in the workplace:
Replace your desk lamp light bulbs and overhead lights (where possible) with Compact Fluorescent Light Bulbs,qualified with the Energy Star. These bulbs use 75% less energy than incandescent bulbs and last up to 10 times as long.<ref>EPA, Energy Star, ''Bring Your Green to Work'', Turn lights off when nobody is using an office, conference room, your workspace, or the whole office at night. Where the lighting controls are on automatic override, talk to building management about having the settings changed to only use sufficient lighting for security and safety purposes, rather than over-lighting the whole building.
Replace your desk lamp light bulbs and overhead lights (where possible) with Compact Fluorescent Light Bulbs,qualified with the Energy Star. These bulbs use 75% less energy than incandescent bulbs and last up to 10 times as long.<ref>EPA, Energy Star, ''Bring Your Green to Work'', Turn lights off when nobody is using an office, conference room, your workspace, or the whole office at night. Where the lighting controls are on automatic override, talk to building management about having the settings changed to only use sufficient lighting for security and safety purposes, rather than over-lighting the whole building.
During cold weather, keep Put Up Blinds to let the warmth in; during warm weather, keep blinds pulled to close out the heat of the summer sun.
Keep window vents clear of paper or other obstructions, to allow the free flow of air.
Use Energy Star rated [[Install a Programmable Thermostat|programmable thermostats]] to automatically adjust heating and cooling in the building so as to avoid wasting energy.
Get an Energy Star qualified Water Dispenser|.These use half the energy as standard units.
Maintain healthy air flow. It’s already bad enough that you have to worry about Air Pollution|air pollution every time you walk outside, but it’s also a big priority when you work inside. If you work in an office, cubicle, or workshop, it's likely that you're spending most of your time indoors - a Canadian survey found that people spend over 96% of time at home indoors and over 83% of time at work or school indoors.
Use Non Toxic Air Fresheners. Water dampened cloths are sufficient to clean most dusty workspaces.
Open your windows to increase air flow. If you can't open windows, be sure to take outdoor breaks throughout the day.
Don’t smoke in or near the office.
Never bring any type of aerosol can to work.
Use an Air Purifier to get rid of contaminants.
Open your windows to increase air flow. If you can't open windows, be sure to take outdoor breaks throughout the day.
Don’t smoke in or near the office.
Never bring any type of aerosol can to work.
Use an Air Purifier to get rid of contaminants.
Green your desk, cubicle, office... literally. Get a plant and place it on or near your desk. Or, even better, buy plants for all of your neighbors. They will not only see this as a friendly gesture, but they’ll also have cleaner air to breathe! Purify the Air Using Plants and increase the flow of oxygen, so get a green accessory to complement your desk! There are many things in your office that you can recycle. If you don’t have a recycling station at work, start one on your own! You can get a few bins and post recycling guidelines above them. Some of them may include recycling.
If you have any Green Office tips let me know!!!
Tuesday, February 08, 2011
Erecting Scaffolding Properly

Opt for casters. If you plan on moving your scaffolding to work on various spots, include casters in your scaffolding setup. Remember to lock the casters when you get it into place.
Assemble the scaffolding frame. Lay out the ends of the scaffolding. Lift one end piece, and attach the upper cross brace. The far end of this brace should support the end piece while you lift the second end piece and attach its upper cross brace. Secure the ends of the cross braces to the bottom of the opposite end frame.
Make sure the scaffold is stable. Move the scaffold into your desired position, and make sure it is level and secure.
Place the planks. Lift the planks through the scaffold bars and into place. Hardware should be included to fasten the planks into place.

Secure access to the scaffold. If ladders are used to access the scaffold, use ones that are designed for that specific scaffold. Stair-like ladders can be used to access the scaffold but must have handrails and treading. A concern with the access point is to make it safe to maneuver. Attach the guardrails. Guardrails are highly recommended for all scaffolding due to the height of the equipment and the risk of falls. Also consider using tie offs and other fall protection.
Inspect the scaffolding to ensure safety. Thoroughly examine the scaffolding setup to make sure all pieces are secure. Reinspect the scaffold system every time you leave the site and return to it to make sure it is still safe.
Jackson Professional Tool Review

In my profession I need durable tools. This is why for shovels I use products like this eagle shovel. When we throw the shingles down to the ground, picking them up is easy with this shovel. Since 1876 the Jackson Professional Tool company has been producing quality tools. This is definitely a company that takes pride in their products. Give these shovels a try, they are also great for landscaping.
Let me know if you have had a great experience using products from Jackson!!!
Roof Detective cooks to................
One of my passions when I am not working is cooking. So I would like to share some recipes with my readers.
BBQ Pork Sandwiches

What I choose to put them together
1 (14 ounce) can beef broth
3 pounds boneless pork ribs
1 (18 ounce) bottle barbecue sauce

- Pour can of beef broth into slow cooker, and add boneless pork ribs. Cook on High heat for 4 hours, or until meat shreds easily. Remove meat, and shred with two forks. It will seem that it's not working right away, but it will.
- Preheat oven to 350 degrees F (175 degrees C). Transfer the shredded pork to a Dutch oven or iron skillet, and stir in barbecue sauce.
- Bake in the preheated oven for 30 minutes, or until heated through.

Oven Baked Plantains


Let me know if you have a favorite spanish recipe!!!
4 very ripe plantians (when the skin is yellow with spots of black they're perfect)
cooking spray

1 Preheat oven to 450°F.
2 Coat a nonstick cookie sheet with cooking spray.
3 Cut the ends off of the plantains and peel.
4 Cut each plantain on the diagonal into 1/2 inch slices.
5 Arrange in single layer and coat tops with cooking spray.
6 Bake, turning occasionally, for 10-15 minutes, until plantains are golden brown and very tender.
Costa Rican Tilapia

Subscribe to:
Posts (Atom)